Github: The Basics
Back to Home
Think of Github as the Facebook for those who write code. You want to share your code (create a repository), you want to like someone’s code (starring repositories), you want to jump into conversations about code because they might have a bug (to submit an issue). Your future employer might also ask for your Github, so building your Github presence is like building a portfolio. But at its core is Git, which is a version control system. In a team setting, you will be able to independently and parallely work on a code and later on merge the changes into a single file. These parallel workflows are called branches. I will walk you through some of the concepts and techniques that lay the foundation for you to master Github. We will be simulating a coding project where you are supposed to overcome the challenges that come with versioning.
Basic Workflow
Reading: Github Guides Github Flow
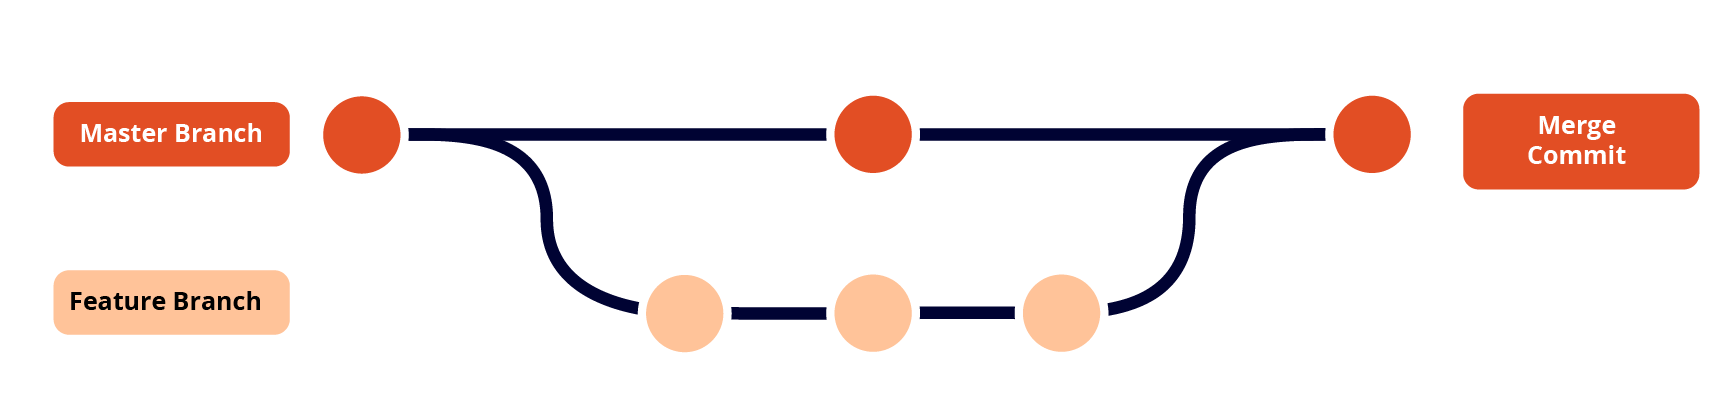
As seen from the figure below, git versioning is useful when your developer team works on new features for your application. For instance, you have a chat application and you want to integrate a voice-recording function, then you would do so by creating a new feature branch spinning off of the master branch. The master branch remains the production branch, and the feature branch becomes the development branch. Once the developments have been finalized, everything has been debugged, then the feature branch can be merged with the master branch.
Glossary of Terms
- repository
- commit
- branch
- merge
- fork
- push/pull
- clone
Exercise 1: Working on your own
Part 1: setting up your environment
- Create a Folder which will be your parent directory for your code.
- Create a text file in which the first line reads as “first line”
- Open Github and create a repository. Save the link it provides you.
- Open Terminal type
cdand drag your folder to the Terminal. Then type the following commands:
Part 2: initialize, add, commit, remote, push
1. Initializing the repository
git init
2. Adding files
Adding all files
git add .
Adding a specific file
git add <file>
and drag your file to the terminal
3. Committing the changes
Alternatively, here you may replace "first commit" with another commit message. It helps you to see what were the last updates you made to the files.
git commit -m"first commit"
4. Adding a Remote
git add remote origin <url>
paste here the URL that you saved
5. Staging (pushing) the changes
git push -u origin master
Now you can check the changes on your repository page on Github.
Exercise 2: Creating Branches, Merging
With the branches you create, you are managing the versions of the file you are editing. The idea is to create branches for beta versions of the file before you stage them on your master branch. Branching also helps to distribute tasks between developers that work on the same code.
1. Creating a branch
Creating a new branch
git checkout -b <branch name>
Using this you will be switched to <branch name>
Basing your new branch on an existing branch
You can base your branch on an existing branch with the following command
git checkout -b new-branch existing-branch
2. Modify your text file
After you create branches, you can make changes in the files you were working in. Add some text to the second line.
3. Add, Commit, Push
Similar to Exercise 1, you can now add the file with: git add . then commit the file with git commit -m"first branch commit" and finally push with git push -u origin <name of your branch>.
Once you think your code is ready, you can merge it back to your original master.
4. Switch to your master
git checkout master
5. Merge & Push
git merge dev
git push
Exercise 3: Group work, simulation of a dev team
This is a simulated task of a development team. You will be paired up. Your team will first clone into one single person’s repository. I will pair you into groups of two or three. There will be a repository owner and one or two collaborators.
If you are a collaborator, follow these steps.
Firstm, navigate to your Desktop with the following command.
cd Desktop
Ask for the repository URL from the repo owner. First fork the repository, then make a clone of the forked repository with the following command. Forking a repository means that you create your own copy of the repository in the Github cloud to work on separately on someone’s project.
git clone <URL of the repository>
Then modify the files in it, and push them to your own repository.
git commit -am"<commit message>"
git push
Then navigate to your forked repository, and make a pull request to the original owner of the repository. Making a pull request means “hey, I added a new feature, check it out and if you like it, merge it into your program!”
If you are the repository owner, follow these steps.
You can check now your incoming pull requests, and decide whether you want to accept the changes or not.
The reason why we had to use Forking is because of push and pull permission access. In a proper developer team, you would not be using open-source collaborative platform to create your code, and pushing/pulling directly from the repository branches would not be an issue.
Logging off of Github on Terminal
git config --global --unset-all
Writing a Readme.md
A Readme.md is a must for your repository. This is how you introduce and explain what your code is about. In fact, it has a very easy syntax. I will give some examples below, and for further reference, check this markdown cheatsheet out.
# H1
## H2
### H3
H1
H2
H3
**bold**
_italics_
~~cross out~~
bold
italics
cross out
Further resources
Github Help Official Documentation
Github Guides Further Tutorials
Youtube: The Coding Train’s Git and Github for Poets